本文前标题:在 Windows 上安装 Stable Diffusion (AUTOMATIC1111)
平台概览
继 ChatGPT 后,Stable Diffusion 以文生图和以图生图的 AI 方案开始在全球逐渐火热,现在就跟着何星星按以下方案来配置你的 Stable Diffusion 吧!~
功能简介
Stable Diffusion 是一种文本到图像的 AI 方案,可以在带有 GPU 的消费级 PC 上运行。完成本教程后,你就可以在自己的 PC 上生成 AI 图像,实现以意念来生成意象中的画面。
系统要求
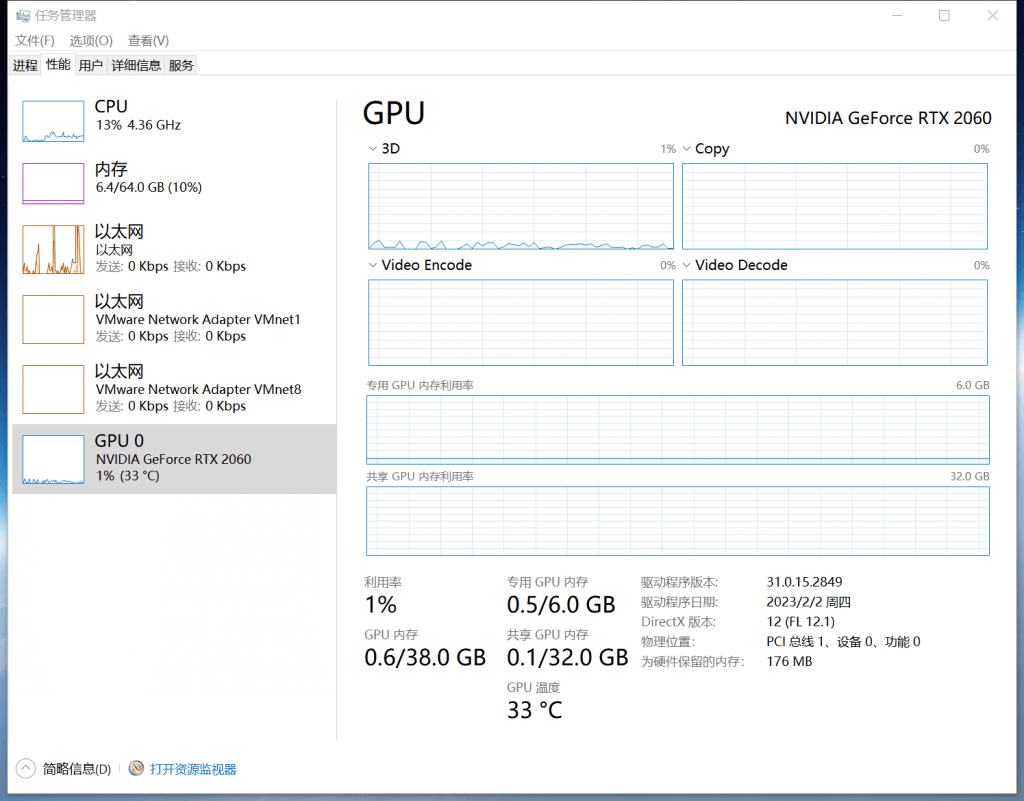
你的 PC 需要运行 Windows 10 或更高版本,以及配备具有 4 GB 或更多显存的 Nvidia 独立显卡。
同时,你必须知道,如果你的 PC 使用集成显卡或 AMD 显卡,那么这将不起作用。

如果你的 PC 不满足以上这些要求,则备选方案是
- 谷歌云服务 Colab,购买拥有实现 Stable Diffusion 的成套方案
- 阿里云或腾讯云带有 GPU 方案的云服务器进行云搭建
- 配备苹果芯片的 M1/M2 较新款 Macbook 系列
配置步骤
1. 安装 Python
1. 在操作以下步骤前,请卸载并清理本机系统已有的 Python 应用程序;
2. 需要安装 Python 3.10.6 来运行 Stable Diffusion,在官网选择 64 位 Windows 安装程序并下载,或点此直接下载链接;
3. 安装 Python 时确保你已勾选 “add Python 3.10 to PATH”,然后点击 “Install Now”开始安装,建议使用以上标注的版本,否则可能无法以本文方法完成配置和运行 Stable Diffusion;
2. 安装 Git
1.Git 是一个代码仓库管理系统,你将需要它来安装和更新 AUTOMATIC1111;
2. 转到此页面下载,建议在官网直接点击头部内容 “Click here to download” 链接下载当前最新版本;
3. 打开安装程序,单击 “Install” 接受许可并安装软件,如果没有必要或你不知道如何自定义安装,安装过程的选项全部保持默认即可;
3. 克隆 web-ui
难度开始增加,请准备好你的情绪与心态~
特别提醒:强烈建议选择安装在非 C 盘位置,在后续使用中所需的模型和 LORA 文件将陆续扩充下载到这个文件夹,一般在常规使用时会有 10G~100G 不等。
请使用以下任意一种方式以 PowerShell 定位到 Stable Diffusion 的目标安装位置:
- 在目标文件夹按住 shift 键并右键空白处,在弹出的右键菜单中选择
在此处打开 PowerShell 窗口 - 在目标文件夹的地址栏覆盖输入
PowerShell并回车,PowerShell 将以该位置就绪等待执行 - 在任意 PowerShell 窗口中输入 cd 追加目标安装位置路径并回车,如:
cd D:\
同时或者你有更方便快捷的方法也可以,能使 PowerShell 以该位置就绪就行,这个不要紧,我们继续;
现在接着在 PowerShell 窗口粘贴以下命令并回车:
git clone https://github.com/AUTOMATIC1111/stable-diffusion-webui.git执行以上命令在等待数秒或数分钟后,你将看到 PowerShell 的窗口提示克隆完成。
如果失败,通常是因为你的网络无法有效连接到目标网站,请自行查找关于网络代理访问的解决方案!
git clone https://github.com/AUTOMATIC1111/stable-diffusion-webui.git
Cloning into 'stable-diffusion-webui'...
remote: Enumerating objects: 18979, done.
remote: Counting objects: 100% (573/573), done.
remote: Compressing objects: 100% (248/248), done.
remote: Total 18979 (delta 359), reused 480 (delta 325), pack-reused 18406
Receiving objects: 100% (18979/18979), 28.88 MiB | 1.32 MiB/s, done.

Resolving deltas: 100% (13233/13233), done.
同时你会在前述流程指定的目标文件夹(如 D:\)看到已经有被创建一个名为 stable-diffusion-webui 的文件夹,说明已经完成了 Stable Diffusion WebUI 的安装。
4. 下载必要模型文件 [1]
接下来,在文件资源管理器打开 stable-diffusion-webui\models\Stable-diffusion,这将转到 Stable Diffusion 的模型存放文件夹位置,你会看到一个名称为 Put Stable Diffusion checkpoints here.txt 的文本文档文件;
下载 Stable Diffusion v1.5 官方模型 CheckPoint 文件(链接)或以及由何星星收集优质的模型集合,然后将其移动到当前文件夹;
返回到 stable-diffusion-webui 文件夹,双击运行 webui-user.bat 文件,其中有 webui-user.bat 和 webui-user.sh 以及 webui-macos-env.sh 三个相似的文件,建议启用显示文件扩展名以识别准确的文件;
5. 运行 Stable Diffusion
在以上流程中双击运行 webui-user.bat 文件,弹出的 CMD 窗口将会显示下载一系列 Stable Diffusion 运行时必须的文件,如果一切正常(通常情况下应该不会那么正常🤣),那么恭喜你,在运行过程结束后的最终屏幕上你会将清楚的看到 Running on local URL: http://127.0.0.1:7860 的提示,此时你可以通过网络浏览器访问 http://127.0.0.1:7860 以使用 Stable Diffusion~
如果要使用 Stable Diffusion 来创作,你必须持续保持 webui-user.bat 在 cmd 窗口运行。
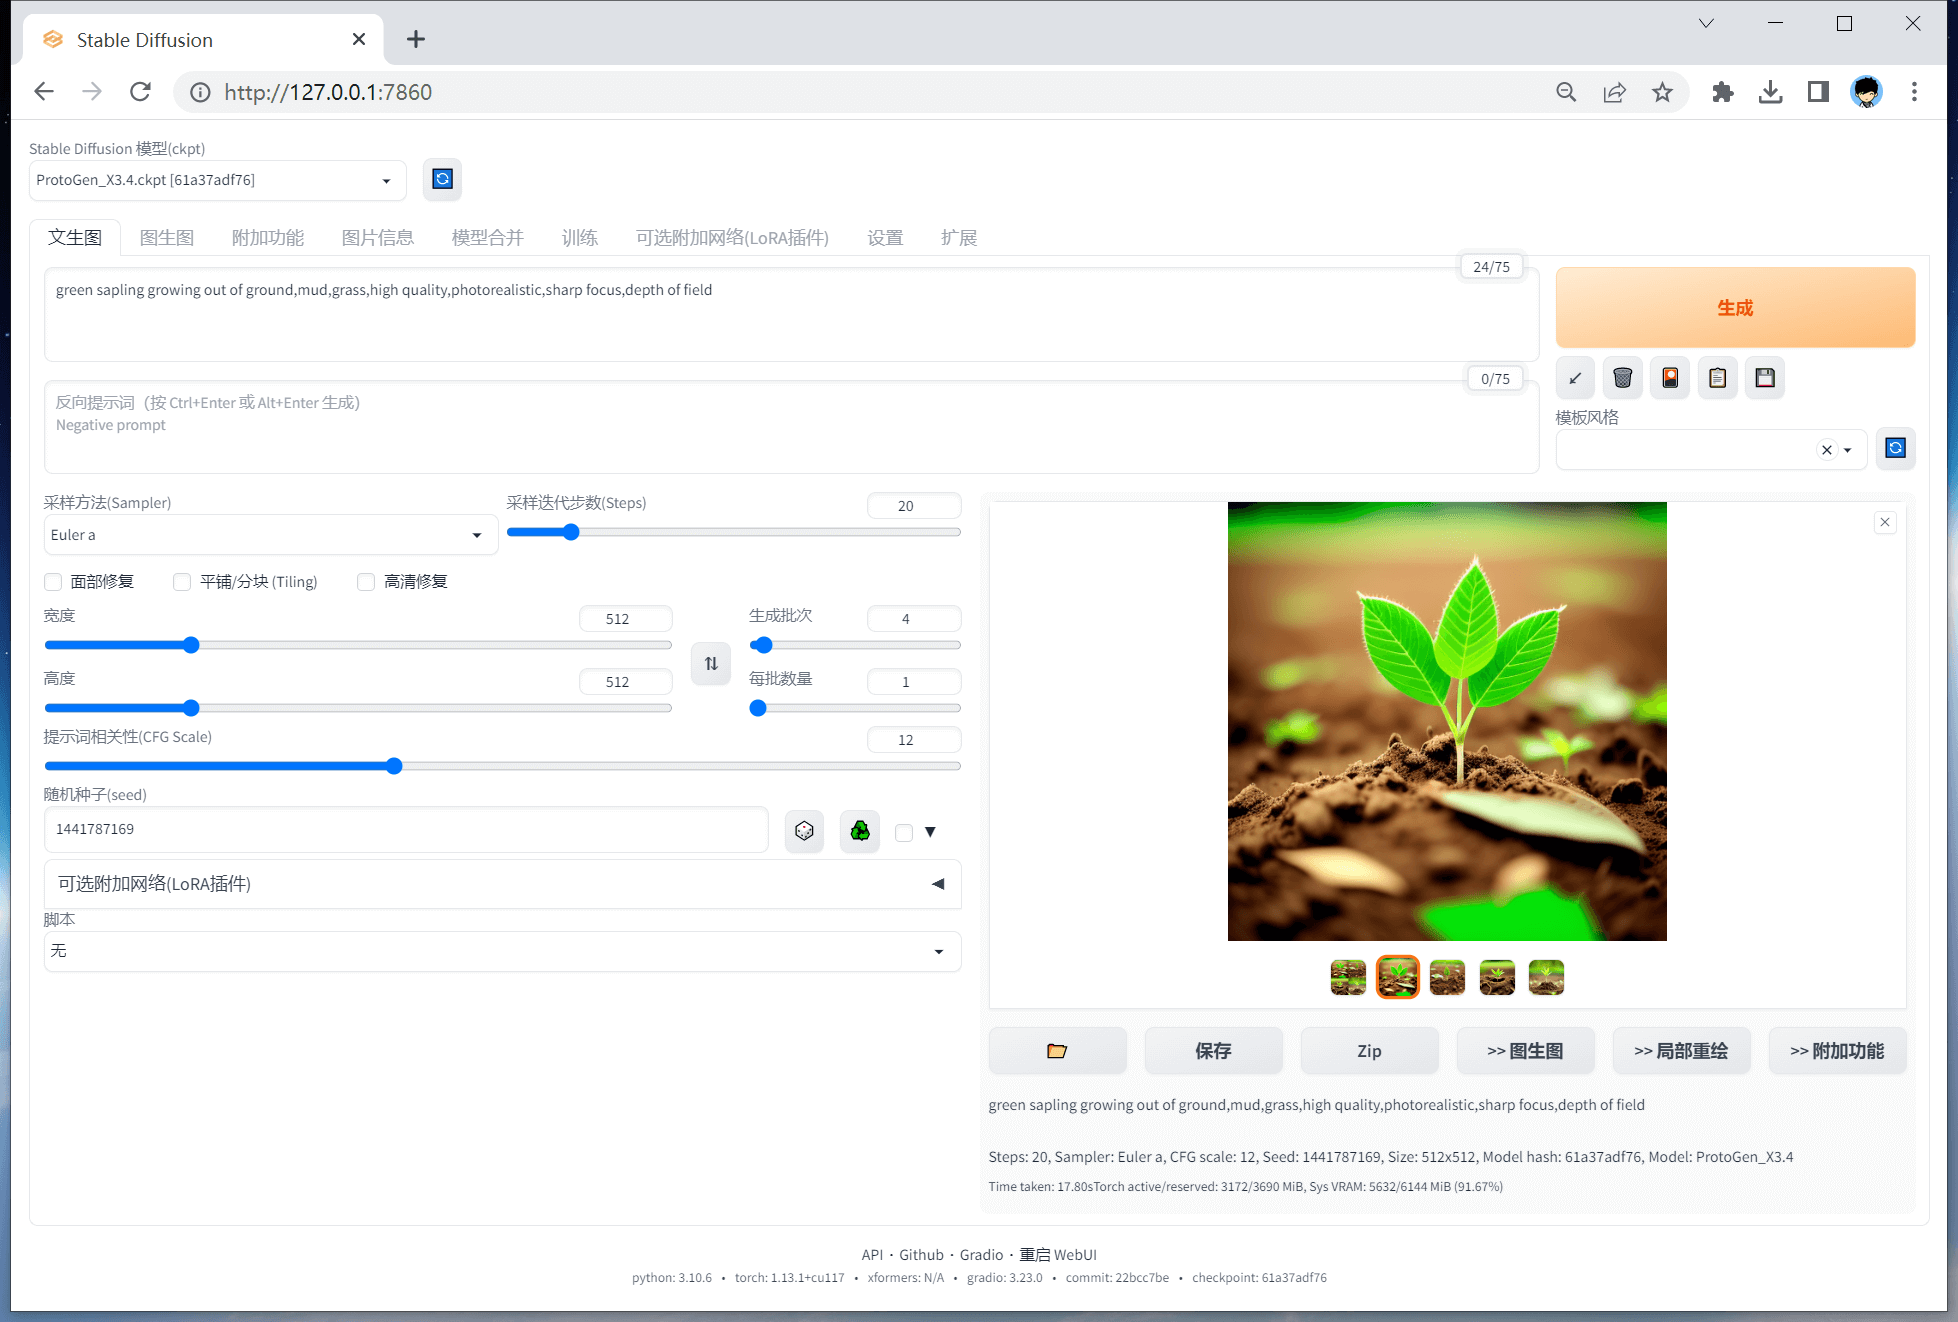
最后,附上何星星最终运行生成图片的截图,根据官方文档的提示词所生成~[2]
同时,如果到此你遇到了麻烦,请继续向下阅读以排除相关问题。

以上图片生成参数信息:
请复制参数到提示词框,再按生成按钮下方的第一个图标(↙)以自动填充参数信息。
green sapling growing out of ground,mud,grass,high quality,photorealistic,sharp focus,depth of field

Steps: 20, Sampler: Euler a, CFG scale: 12, Seed: 1441787169, Size: 512x512, Model hash: 61a37adf76, Model: ProtoGen_X3.4, Hashes: {"vae": "735e4c3a44", "model": "61a37adf76"}
疑难排解
配置时报错 Couldn't install gfpgan.
Installing gfpgan
Traceback (most recent call last):
File "D:\stable-diffusion-webui\launch.py", line 355, in <module>
prepare_environment()
File "D:\stable-diffusion-webui\launch.py", line 263, in prepare_environment
run_pip(f"install {gfpgan_package}", "gfpgan")
File "D:\stable-diffusion-webui\launch.py", line 129, in run_pip
return run(f'"{python}" -m pip {args} --prefer-binary{index_url_line}', desc=f"Installing {desc}", errdesc=f"Couldn't install {desc}")
File "D:\stable-diffusion-webui\launch.py", line 97, in run
raise RuntimeError(message)
RuntimeError: Couldn't install gfpgan.
Command: "D:\stable-diffusion-webui\venv\Scripts\python.exe" -m pip install git+https://github.com/TencentARC/GFPGAN.git@8d2447a2d918f8eba5a4a01463fd48e45126a379 --prefer-binary
Error code: 1
stdout: Collecting git+https://github.com/TencentARC/GFPGAN.git@8d2447a2d918f8eba5a4a01463fd48e45126a379
Cloning https://github.com/TencentARC/GFPGAN.git (to revision 8d2447a2d918f8eba5a4a01463fd48e45126a379) to c:\users\hexingxing\appdata\local\temp\pip-req-build-mfguhpgl
stderr: Running command git clone --filter=blob:none --quiet https://github.com/TencentARC/GFPGAN.git 'C:\Users\hexingxing\AppData\Local\Temp\pip-req-build-mfguhpgl'
fatal: unable to access 'https://github.com/TencentARC/GFPGAN.git/': Recv failure: Connection was reset
fatal: could not fetch fa702eeacff13fe8475b0e102a8b8c37602f3963 from promisor remote
warning: Clone succeeded, but checkout failed.
You can inspect what was checked out with 'git status'
and retry with 'git restore --source=HEAD :/'
error: subprocess-exited-with-error
git clone --filter=blob:none --quiet https://github.com/TencentARC/GFPGAN.git 'C:\Users\hexingxing\AppData\Local\Temp\pip-req-build-mfguhpgl' did not run successfully.
exit code: 128
See above for output.
note: This error originates from a subprocess, and is likely not a problem with pip.
请按任意键继续. . .下载 gfpgan:https://github.com/TencentARC/GFPGAN,在该页面选择 Code -> Download ZIP
解压至 Stable Diffusion 目录的脚本文件夹,stable-diffusion-webui\venv\Scripts
打开 PowerShell 运行以下命令进入到 GFPGAN-master 目录
cd D:\stable-diffusion-webui\venv\Scripts\GFPGAN-master依次运行以下命令,如果出错,请关闭所有网络代理,使用普通网络重试
注意以下 ..\python.exe 是 D:\stable-diffusion-webui\venv\Scripts\python.exe 的简写
..\python.exe -m pip install basicsr facexlib以上命令完成后将提示 Successfully installed PyWavelets-1.4.1 absl-py-1.4.0 ... ...
..\python.exe -m pip install -r requirements.txt以上命令完成后将提示,同时其后提示的升级不建议此时操作
[notice] A new release of pip available: 22.2.1 -> 23.1.2
[notice] To update, run: E:\stable-diffusion-webui\venv\Scripts\python.exe -m pip install --upgrade pip
..\python.exe setup.py develop以上命令完成后将提示 Finished processing dependencies for gfpgan==1.3.8
再次尝试运行 webui-user.bat,直到你能看到提示 Running on local URL: http://127.0.0.1:7860
配置时报错 Couldn't install open_clip.
Installing open_clip
Traceback (most recent call last):
File "D:\stable-diffusion-webui\launch.py", line 355, in <module>
prepare_environment()
File "D:\stable-diffusion-webui\launch.py", line 269, in prepare_environment
run_pip(f"install {openclip_package}", "open_clip")
File "D:\stable-diffusion-webui\launch.py", line 129, in run_pip
return run(f'"{python}" -m pip {args} --prefer-binary{index_url_line}', desc=f"Installing {desc}", errdesc=f"Couldn't install {desc}")
File "D:\stable-diffusion-webui\launch.py", line 97, in run
raise RuntimeError(message)
RuntimeError: Couldn't install open_clip.
Command: "D:\stable-diffusion-webui\venv\Scripts\python.exe" -m pip install git+https://github.com/mlfoundations/open_clip.git@bb6e834e9c70d9c27d0dc3ecedeebeaeb1ffad6b --prefer-binary
Error code: 1
stdout: Collecting git+https://github.com/mlfoundations/open_clip.git@bb6e834e9c70d9c27d0dc3ecedeebeaeb1ffad6b
Cloning https://github.com/mlfoundations/open_clip.git (to revision bb6e834e9c70d9c27d0dc3ecedeebeaeb1ffad6b) to c:\users\hexingxing\appdata\local\temp\pip-req-build-ja0q9kxg
stderr: Running command git clone --filter=blob:none --quiet https://github.com/mlfoundations/open_clip.git 'C:\Users\hexingxing\AppData\Local\Temp\pip-req-build-ja0q9kxg'
fatal: unable to access 'https://github.com/mlfoundations/open_clip.git/': Recv failure: Connection was reset
error: subprocess-exited-with-error
git clone --filter=blob:none --quiet https://github.com/mlfoundations/open_clip.git 'C:\Users\hexingxing\AppData\Local\Temp\pip-req-build-ja0q9kxg' did not run successfully.
exit code: 128
See above for output.
note: This error originates from a subprocess, and is likely not a problem with pip.
请按任意键继续. . .问题解决方法如同报错 Couldn't install gfpgan.
下载 https://github.com/mlfoundations/open_clip,在该页面选择 Code -> Download ZIP
解压至 Stable Diffusion 目录的脚本文件夹,stable-diffusion-webui\venv\Scripts
打开 PowerShell 运行以下命令进入到 open_clip-main 目录
cd D:\stable-diffusion-webui\venv\Scripts\open_clip-main依次运行以下命令,如果出错,请关闭所有网络代理,使用普通网络重试
..\python.exe setup.py build install如果以上显示 time_out,以上命令可以多次尝试,直到成功处理并提示
Finished processing dependencies for open-clip-torch==2.17.1
再次尝试运行 webui-user.bat,直到你能看到提示 Running on local URL: http://127.0.0.1:7860
Cloning Stable Diffusion into D:\stable-diffusion-webui\repositories\stable-diffusion-stability-ai...配置时报错 CUDA out of memory
该报错一般发生在显存容量小于 4G 的设备上,通常在以上过程中即可正常使用 Stable Diffusion WebUI~
打开全局代理后等待,如果遇到某个段落失败或连接超时,关闭当前会话再次重试运行 webui-user.bat
过程中如果出现以下报错信息:Stable diffusion model failed to load, exiting
venv "D:\stable-diffusion-webui\venv\Scripts\Python.exe"
Python 3.10.6 (tags/v3.10.6:9c7b4bd, Aug  1 2022, 21:53:49) [MSC v.1932 64 bit (AMD64)]
Commit hash: 22bcc7be428c94e9408f589966c2040187245d81
Installing requirements for Web UI
Launching Web UI with arguments:
No module 'xformers'. Proceeding without it.
Loading weights [cc6cb27103] from D:\stable-diffusion-webui\models\Stable-diffusion\v1-5-pruned-emaonly.ckpt
Creating model from config: D:\stable-diffusion-webui\configs\v1-inference.yaml
LatentDiffusion: Running in eps-prediction mode
DiffusionWrapper has 859.52 M params.
loading stable diffusion model: OutOfMemoryError
Traceback (most recent call last):
  File "D:\stable-diffusion-webui\webui.py", line 139, in initialize
    modules.sd_models.load_model()
  File "D:\stable-diffusion-webui\modules\sd_models.py", line 449, in load_model
    sd_model.to(shared.device)
  File "D:\stable-diffusion-webui\venv\lib\site-packages\lightning_fabric\utilities\device_dtype_mixin.py", line 54, in to
    return super().to(*args, **kwargs)
  File "D:\stable-diffusion-webui\venv\lib\site-packages\torch\nn\modules\module.py", line 989, in to
    return self._apply(convert)
  File "D:\stable-diffusion-webui\venv\lib\site-packages\torch\nn\modules\module.py", line 641, in _apply
    module._apply(fn)
  File "D:\stable-diffusion-webui\venv\lib\site-packages\torch\nn\modules\module.py", line 641, in _apply
    module._apply(fn)
  File "D:\stable-diffusion-webui\venv\lib\site-packages\torch\nn\modules\module.py", line 641, in _apply
    module._apply(fn)
  [Previous line repeated 2 more times]
  File "D:\stable-diffusion-webui\venv\lib\site-packages\torch\nn\modules\module.py", line 664, in _apply
    param_applied = fn(param)
  File "D:\stable-diffusion-webui\venv\lib\site-packages\torch\nn\modules\module.py", line 987, in convert
    return t.to(device, dtype if t.is_floating_point() or t.is_complex() else None, non_blocking)
torch.cuda.OutOfMemoryError: CUDA out of memory. Tried to allocate 20.00 MiB (GPU 0; 2.00 GiB total capacity; 1.68 GiB already allocated; 0 bytes free; 1.72 GiB reserved in total by PyTorch) If reserved memory is >> allocated memory try setting max_split_size_mb to avoid fragmentation.  See documentation for Memory Management and PYTORCH_CUDA_ALLOC_CONF


Stable diffusion model failed to load, exiting
请按任意键继续. . .
说明遇到运行显存容量故障,VRAM 低于要求的容量,需要通过 set COMMANDLINE_ARGS=--lowvram 命令来要求 Stable Diffusion 以较慢速度和较差质量的标准来输出结果。
打开你的 Stable Diffusion 目录,我的本地实际路径为 D:\stable-diffusion-webui\,选择 webui-user.bat 并右键点击编辑,将 set COMMANDLINE_ARGS=--lowvram 语句粘贴至 call webui.bat 之前一行保存文件,再次重试运行 webui-user.bat;[3]
直到你能看到提示 Running on local URL: http://127.0.0.1:7860
查询当前 CUDA Version
如果需要查询 CUDA 信息,请使用 PowerShell 输入 nvidia-smi 并回车,如下显示:
PS C:\Users\hexingxing> nvidia-smi
Thu May  5 18:35:22 2023
+-----------------------------------------------------------------------------+
| NVIDIA-SMI 528.49       Driver Version: 528.49       CUDA Version: 12.0     |
|-------------------------------+----------------------+----------------------+
| GPU  Name            TCC/WDDM | Bus-Id        Disp.A | Volatile Uncorr. ECC |
| Fan  Temp  Perf  Pwr:Usage/Cap|         Memory-Usage | GPU-Util  Compute M. |
|                               |                      |               MIG M. |
|===============================+======================+======================|
|   0  NVIDIA GeForce ... WDDM  | 00000000:01:00.0  On |                  N/A |
| 48%   38C    P8    20W / 160W |   3043MiB /  6144MiB |      1%      Default |
|                               |                      |                  N/A |
+-------------------------------+----------------------+----------------------+

+-----------------------------------------------------------------------------+
| Processes:                                                                  |
|  GPU   GI   CI        PID   Type   Process name                  GPU Memory |
|        ID   ID                                                   Usage      |
|=============================================================================|
|    0   N/A  N/A       880    C+G   ...ram Files\Astar\Astar.exe    N/A      |
|    0   N/A  N/A      4464    C+G   ...cw5n1h2txyewy\LockApp.exe    N/A      |
|    0   N/A  N/A      6716    C+G   ...2txyewy\TextInputHost.exe    N/A      |
|    0   N/A  N/A      9472    C+G   C:\Windows\explorer.exe         N/A      |
|    0   N/A  N/A     10348    C+G   ...fice\Office15\OUTLOOK.EXE    N/A      |
|    0   N/A  N/A     11088    C+G   ...5n1h2txyewy\SearchApp.exe    N/A      |
|    0   N/A  N/A     15832    C+G   ...lugins\FlutterPlugins.exe    N/A      |
|    0   N/A  N/A     17528    C+G   ...y\ShellExperienceHost.exe    N/A      |
|    0   N/A  N/A     20352      C   ...thon\Python310\python.exe    N/A      |
+-----------------------------------------------------------------------------+
运行时报错 Expecting value: line 1 column 1 (char 0)
报错详情为 Something went wrong Expecting value: line 1 column 1 (char 0),断开/连接代理然后重新执行以下命令:
- 进入
Stable Diffusion文件夹 - 双击
webui.sh文件 - 重启
webui-user.bat文件 - 刷新
http://127.0.0.1:7860页面
运行时报错 All connection attempts failed
报错详情为 Something went wrong All connection attempts failed,断开/连接代理然后重新执行以下命令:
- 进入
Stable Diffusion文件夹 - 双击
webui.sh文件 - 重启
webui-user.bat文件 - 刷新
http://127.0.0.1:7860页面
运行时报错 AttributeError: 'NoneType' object has no attribute 'pop'
原因是模型错误,检查 model 有没有放错文件夹或者用了不支持(损坏)的模型。
显存容量低于标准要求
如果你的独立显卡 VRAM 小于 8 GB,建议打开--medvram 调节应用内存的选项,如果小于 4GB,请使用 --lowvram,以此降低 VRAM 的使用以便你可以稳定正常的运行 Stable Diffusion,如果没有进行该项设置,你可能会出现以下故障报错:CUDA_out_of_memory。
如果计划设置,请在 Stable Diffusion 的根文件夹找到 webui-user.bat 文件并右键选择编辑,如果你使用 Windows 11,应该需要先选择 “显示更多选项”。
替换以下命令行
set COMMANDLINE_ARGS=
为
set COMMANDLINE_ARGS=--xformers --medvram
或
set COMMANDLINE_ARGS=--xformers --lowvram
保存并关闭 webui-user.bat 文件,最终它应该是如下这样显示的。
@echo off

set PYTHON=
set GIT=
set VENV_DIR=
set COMMANDLINE_ARGS=--xformers --lowvram

call webui.bat
--xformers 以非确定性结果为代价,加快图像生成速度,并降低了显存的使用率
--xformers-flash-attention 优化以上代码可能产生质量和精度的问题
--medvram 以中等显存模式运行,根据实际情况与下方命令任意一种
--lowvram 以低等显存模式运行,根据实际情况与上方命令任意一种
汉化 Stable Diffusion WebUI
简体中文版本
仅对必要的项目进行双语显示,其他汉语显示,简易清晰,为使用者辅助翻译。
以下汉化项目发布者的文档快速以汉化你的 Stable Diffusion WebUI,界面将以简单中英文双语显示。
https://github.com/dtlnor/stable-diffusion-webui-localization-zh_CN
注意:如果使用【通过官方扩展列表安装】,你应将其地址更改为如下地址才能搜索到该插件。
https://raw.githubusercontent.com/wiki/AUTOMATIC1111/stable-diffusion-webui/Extensions-index.md
中英双语版本
对整体界面的项目内容全部进行双语显示,略显复杂和混乱,对初学者很有用。
以下汉化项目发布者的文档快速以汉化你的 Stable Diffusion WebUI,界面将以完全中英文双语显示。
https://github.com/journey-ad/sd-webui-bilingual-localization
https://github.com/VinsonLaro/stable-diffusion-webui-chinese
更新 AUTOMATIC1111
默认情况下, AUTOMATIC1111 副本不会自动更新,但考虑到事物发展的速度很快,可能需要在某个时候更新以使用最新和最酷的效果。
更新它有两个选项
- (1) 每次运行时更新
- (2) 仅在需要时更新
每次运行时更新
如果要在运行 Stable Diffusion WebUI 时更新,请编辑文件 webui-user.bat. 在调用 webui.bat 的行之前添加 “git pull”。该文件应该看起来像如下这样:
@echo off

set PYTHON=
set GIT=
set VENV_DIR=
set COMMANDLINE_ARGS=--xformers --medvram
git pull
call webui.bat
从现在开始,Stable Diffusion WebUI 将在每次启动时自行更新。
根据需要更新
使用最新版本可能不是一个好主意,因为某些东西可能会被破坏。定期更新或仅在需要新功能时更新是一种更谨慎的方法。
如果要更新 Stable Diffusion WebUI,请打开命令提示符(cmd) 并使用以下命令转到 Stable Diffusion WebUI 的文件夹。%userprofile%(如果将其安装在其他地方,则需要进行更改。)
cd %userprofile%\stable-diffusion-webui并运行以下命令
git pull重置 Stable Diffusion WebUI
如果 git pull 显示错误,通常是因为不小心更改了一些文件,可以使用以下两个命令重置 webui 文件夹。
cd %userprofile%\stable-diffusion-webui
git checkout -f master
并运行以下命令
git pull请注意,所有文件都将被重置,将需要再次进行更改 webui-user.bat。
恢复到以前的版本
有时候最新版的 webui 坏了,不想用了,可以按照以下说明恢复到以前的版本。
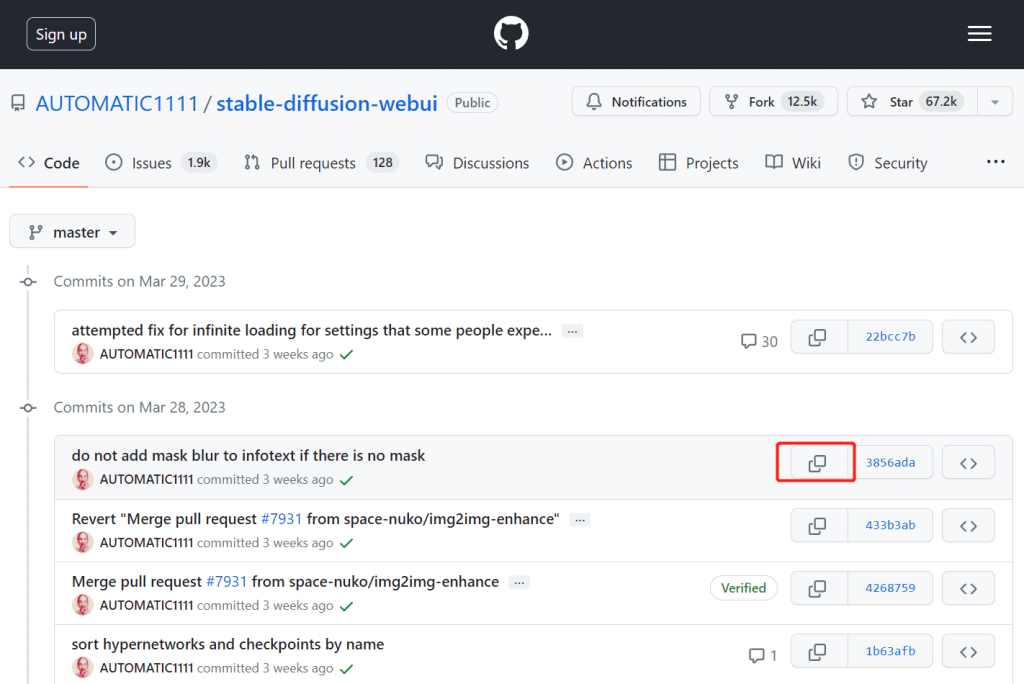
第 1 步:转到此页面查看以前的版本。每行都是以前的版本;
第 2 步:选择现在要恢复到的先前版本,请根据可以看到的日期和评论来判断;
第 3 步:按复制按钮复制版本的哈希值;

第 4 步:在命令提示符下,运行以下命令;
哈希值(3856ada5cc9ac4124e20ff311ce7aa77330845d9)只是举例。实际环境请粘贴刚刚复制的那个。
cd %userprofile%\stable-diffusion-webui
git checkout 3856ada5cc9ac4124e20ff311ce7aa77330845d9
如果看到错误,请重置 webui(请参阅上一节)并重试。
线上版本
https://huggingface.co/darkstorm2150
参考文档
[1] https://github.com/civitai/civitai/wiki/How-to-use-models
[2] https://github.com/AUTOMATIC1111/stable-diffusion-webui
[3] https://github.com/AUTOMATIC1111/stable-diffusion-webui/issues/7018

0 条评论